Home / Guides
How to set up Discord onboarding, step by step
Onboarding is the screen people see when they join your server: a few questions, and each answer gives them roles and channels. Set it up once and every new member lands in the right place instead of a wall of channels.
On this page
What onboarding does
Onboarding is built into Discord, so you don't need a bot for it. Discord describes the setup in three moves: pick the default channels everyone sees, write questions, and link each answer to channels and roles. On top of that you can add a Server Guide and rules. This is what a new member goes through:
- Joinsclicks your invite
- Answersyour questions
- Gets rolesand the channels that go with them
- Server Guidewelcome and first steps
- Rulesif Rules Screening is on
Discord's own note matters here: even with default channels set, every new person has to finish onboarding before they can post.
Before you start
- Your server needs Community turned on. The Onboarding tab only exists on Community servers (step 1).
- You need the right permissions: Manage Server and Manage Roles, or Administrator.
- Enough public channels. Discord asks for at least 7 default channels, and at least 5 of them must let @everyone view and send messages.
- The roles your answers will give, already created in Server Settings → Roles. Make them first; it saves going back and forth.
Menu names below are from the English Discord app in October 2026. Discord moves things around now and then; if a name doesn't match, the official articles linked at the bottom have the current wording.
Step 1: Turn on Community
Open Server Settings → Enable Community and follow the setup. Discord checks a few safety basics before it lets you continue:
- Verification level: members need a verified email before they can send messages or DM other members (users who already have a role skip this).
- Explicit media content filter: scan media from all members.
- A rules channel that everyone can see, for example
#rules. - A Community Updates channel, where Discord sends news for admins and moderators. Keep it private to staff.
Once Community is on, Server Settings → Onboarding appears in the sidebar.
Step 2: Choose the default channels
Default channels are the channels every new member sees in their list, whatever they answer. Pick the ones that make sense for everyone:
- announcements, rules and a general chat;
- your main topic channel (clips, art, the game you play);
- a voice channel if your community talks live.
Leave out channels that only matter to some people: those belong in the questions. And keep an eye on Discord's rule from above: 7 default channels, 5 of them open to @everyone for reading and writing. If onboarding refuses to save, this is usually why.
Step 3: Write questions that give roles
This is the part that makes the difference. In the Onboarding settings you add customisation questions, and for each answer you choose which roles and channels it gives. One answer can give several roles and several channels.
Three kinds of question that work for creators
- "What brings you here?" Viewers, other creators, people looking for a team. Each answer opens the right corner of the server.
- "What's your rank?" or "What do you play?" Gives a role people can be found by, and opens game channels.
- "Want a ping when I go live / post?" Gives a notification role. People choose it themselves, so nobody feels spammed.
The settings on each question
- Ask before member joins: the question shows up before the person enters. Discord recommends it for questions that give important roles and channels. Questions without it can be answered later from Channels & Roles.
- Required: people must answer to get in. Use it for the one question that really sorts people.
- More than one answer: let people pick several when it makes sense ("Choose all that apply" on the screenshot below).
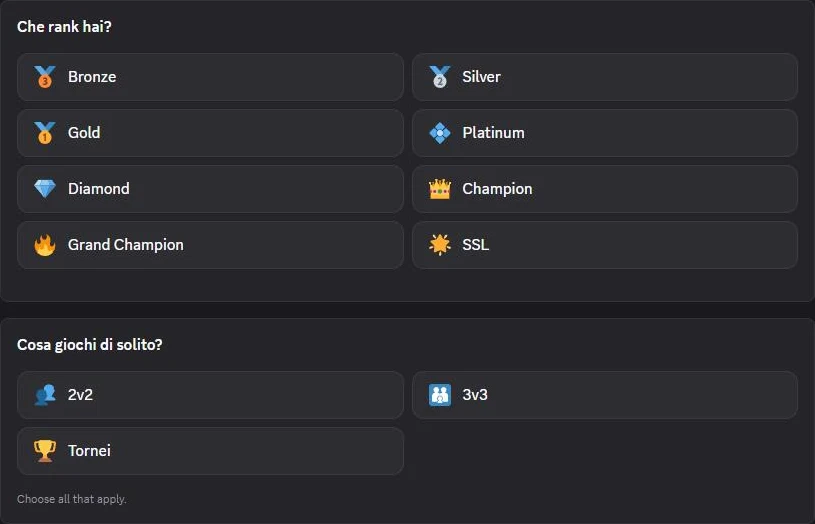
Keep it short. One to three questions before joining is plenty, with short answers and an emoji each so they scan fast. Every extra question is one more reason to close the window.
Rather have it done for you?
Follow this guide and you can do it yourself in an evening. Or send me your server: the audit is free, and I tell you the 3 to 5 things that are costing you members.
Step 4: Set up the Server Guide
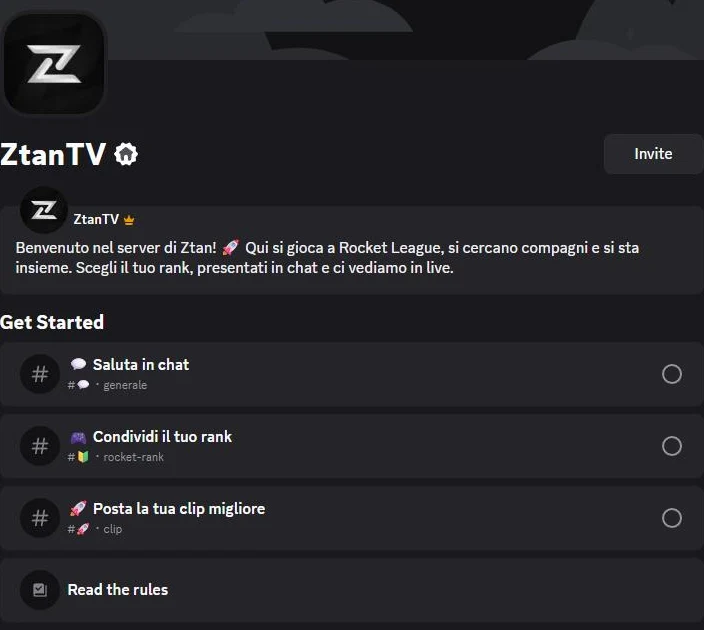
The Server Guide is the page new members land on after onboarding. It has three parts:
- Welcome sign: a short message from you, at the top.
- New member to-dos: 3 to 5 small tasks, like "say hi in #general" or "post your best clip".
- Resource pages: read-only channels (rules, FAQ, schedule) turned into pages. They leave the channel list and live in the guide.
When the Server Guide is on, new members no longer see the old Welcome Screen, so you don't need to keep both up to date.
Step 5: Rules, test and enable
- Rules go in Rules Screening, not in a question. If you use Rules Screening, Discord shows it after onboarding: people accept the rules before they can post. Discord itself advises not to put rules inside onboarding questions.
- Test with a second account (or ask a friend) before you share the invite: answer every question and check that each answer opens what you expect.
- Enable onboarding from the review step. You can come back and change questions at any time.
Checklist
- Community is on, with a rules channel and a private Community Updates channel
- The roles for every answer exist, and sit below your bot and staff roles
- At least 7 default channels, at least 5 open to @everyone
- 1 to 3 questions before joining, with short answers
- Every answer gives at least one role or channel
- The sorting question is Required
- A ping role people choose themselves, instead of @everyone
- Server Guide: welcome sign, 3 to 5 to-dos, rules and FAQ as resource pages
- Rules Screening on, rules not repeated as a question
- Tested with a second account, from join to first message
Common mistakes
- Answers that give nothing. If "Viewer" and "Creator" open the same channels, the question is decoration. Cut it.
- Ten questions. People came to chat, not to fill in a form. Ask what changes what they see; the rest can wait in Channels & Roles.
- Roles above the bot. A bot can only manage roles below its own. If a bot hands out roles too, drag its role above them in Server Settings → Roles.
- Hidden channels nobody can reach. If a channel isn't a default and no answer opens it, new members will never find it. Discord's own setup tip says the same.
- Old verification bots left on. A "react to get verified" bot on top of onboarding means two doors. Pick one: onboarding plus Rules Screening covers most creator servers.
- Never testing it. As the owner you see every channel, so you don't see what a new member sees. Use a second account.
FAQ
Why can't I find Onboarding in my server settings?
Usually because Community isn't turned on yet, or your role lacks Manage Server and Manage Roles. Turn on Community first (step 1).
Do members who were already in the server go through onboarding?
Onboarding runs when someone joins. Members who were already there can pick roles and channels from Channels & Roles, so post a message telling them it exists.
How many questions should I ask?
One to three before joining. More questions can live in Channels & Roles, where people answer them when they want.
Does onboarding stop bots and raids?
Not on its own. Use it together with a verification level, AutoMod and Raid Protection. The setup checklist covers all three.
Do I need a bot for onboarding?
No. Onboarding, the Server Guide and Rules Screening are all built into Discord. Bots are only needed for extras like live notifications.
Do it yourself, or I do it for you
This guide is everything I do when I set up onboarding. If you'd rather skip it, start with the free audit, or pick a plan and see your server live before you pay.
Official Discord articles
- Community Onboarding FAQ
- Community Onboarding Examples
- Enabling Your Community Server
- Server Guide FAQ
- Rules Screening FAQ
- Discord blog: Welcome your new members with Community Onboarding